May I see your identification please? Theft comes in many forms and recently garden bloggers have discovered that there are bad guys who will steal our content.
Including a blog name and link in a "signature" on your posts allows the reader to click back to the original source. It would take some effort for a thief to remove a signature from every post, so they may move on to easier targets.
Using a blog post template is an easy and automatic way to add that "blog signature" information for all new posts!
With a template, you don't have to retype the same information over-and-over again. However, you are still free to change the wording slightly if you want to make the information unique for a specific blog post.
My instructions are for using Blogger from Google™. If you are using another host, such as Wordpress™, then there is probably a similar option available.
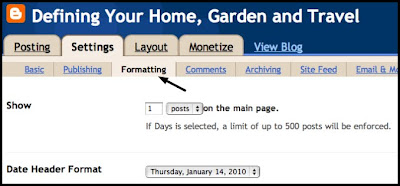
Go to your Dashboard in Blogger. Listed under your blog name, choose Settings
 Click on the tab Formatting
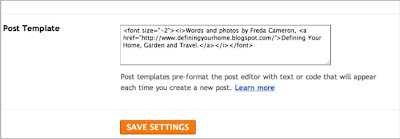
 Scroll down to Post Template
 In the box to the right, you can enter text and code that you want to appear in the Blogger EDITOR whenever you create a NEW POST.
 My example links to my blog so that a reader can always click back to the original source. You don't have to include a link, of course. Save the settings when you are finished. You can come back and edit this again at any time and it will be used on all subsequent new posts.
The example in the purple box below shows the code magnified. You can copy and paste this code into your post temple, then just substitute your information where I have included my name, blog url address and blog name.
Since I'm a freelance writer, I include my name as a byline. Many bloggers want to remain anonymous and will not add their real name. Edit the information to fit your needs.
Remember - Only include the information that you want to share with the world!
 (Note: I typically put the period outside the blog name url as shown in the magnified code. To make the code easier for you to read in the next examples, it is part of the blog name)
Below is the coding shown line-by-line so that you can see the different parts of the example.
I use a smaller font size than my blog post by applying the "-2" html coding. I also use italics for my signature. These are optional codes that you may not want to use. Please note that each line has a wrapper, meaning that there is code to begin the formatting and code to end the formatting. The matching codes are shown in matching font colors.
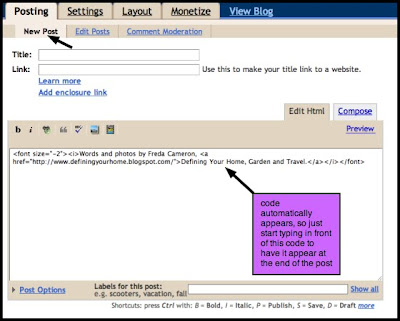
 When you create a NEW POST within the "Edit Html" mode, then the text will automatically appear in the Blogger EDITOR window as Html code.
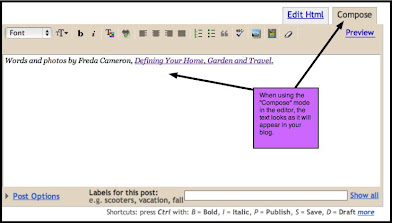
 If you create a NEW POST with the "Compose" mode, then your text will appear as normal without the Html codes shown. (You may click back-and-forth between the html and the compose modes if you wish.)
You may edit the text and code if you want to add a date, location, other information to change the wording to apply to an individual post. To write your post, just start typing in front of the automatic code.
Html Mode:

Compose Mode:
 The result:
Words and photos by Freda Cameron, Defining Your Home, Garden and Travel.


